
Winter Therapy, Winter sowing!
- goshenacres
- Jan 27, 2022
- 9 min read
Updated: Jan 30, 2022
Well, the holidays are over, the deep house cleaning is well on its way and now is the time of the year that the long stretch of chomping at the bit begins. The garden fever starts to set in, and you just want spring to come all ready! We got dumped on with snow this morning and so mother nature is saying, "no dear I have more rest to do before we can wake everything up." So, I wait patiently, like a kid waiting to open that present that's been sitting there just mocking me. Gardening will have to wait, at least in this neck of the woods.... or will it??
A few years ago, I heard about, researched and tried winter sowing and it is a keeper activity! So, what is winter sowing?
Most all seeds go thru a dormant period where they must go thru a process that stratifies them. What is that? This is when the seed goes thru a dormant stage and the elements and weather prepare the seed for germination, mainly by scratching or thinning the hard wall that protects the seed. It is thru this process that the seed then can be strong and ready to wake up and grow. One interesting thing is that the seed KNOWS when to grow. It must detect a certain number of days that the temperature of the ground is above a certain temperature, and it then knows it is safe to begin its journey. One of my questions was that if we had some warmer days would they be fooled into growing, but I found they are pretty fool proof. What you are doing for winter sowing is giving them this opportunity to be prepared and more successful.
The other interesting question I had when I started was if they are annuals wouldn't it be too cold? Then I started thinking... tomatoes are annuals. If we would throw old tomatoes into the compost or tomatoes got left in the garden the season before, they would grow. We always had a volunteer crop of tomatoes that would spring up all “willy nilly” on their own and in their own space, and most of the times these are the tomatoes that did the best!
Many people plant indoors during the early spring to get their seedlings growing, so why would I winter sow instead? Here's my take. I HAVE A LOT OF SEEDS I WANT TO START!
- Space...If I was to start under lights all that I want to start, we would probably have to build a new room! The cost.... You need to buy the proper lights and shelving, and then the cost to operate the lights.
- Watering.... If you have ever had shelves of plant starts you know that watering is a task, to say the least, and it has to be done very frequently.
- Timing.... seeds have a time to maturity and each one is different. If you start them at the same time, then you have a big problem that is going to happen. What will happen is that many plants will get lanky and spindly and will not have room to grow up.
- Weather...... all indoor plants need to be "hardened off" before putting in the garden. What does this mean? A plant when it grows in a protected and still environment will not create a strong and flexible body. They get strong by adversity; in nature the wind and rain will help it to adjust and strengthen to withstand whatever the elements throw at it. When you have started plants indoors, they are weak and not tolerant of anything, but the perfect environment you created for it. In order to have them toughen up you need to take them out and in during the day for a few days, increasing increments of time each day. You will want to do this until they can adjust and try to grow strong. If you have a lot of plants... this is a pain in the hootenanny and a lot of extra care.
With winter sowing, there is no indoor space needed. You plant in your container, cover and stick outside in the snow. You need no lights or electricity because you have just given them to mother nature to nurture to life. There is no watering necessary, until they start to sprout and then you can water, but your outside so who cares if you make a mess? There is no big calendar, no calculations and no math included. Mother nature will take care of that for you too. When it is time to start growing, she will gently wake them to life. The weather makes no difference and hardening them off is very easy because they have been outside all along. As they start to grow by daily lifting their lids they can breathe and dance in the air, but still have some protection to ensure that they are safe. By the time they are ready to set out, they will be adjusted and hardened off.
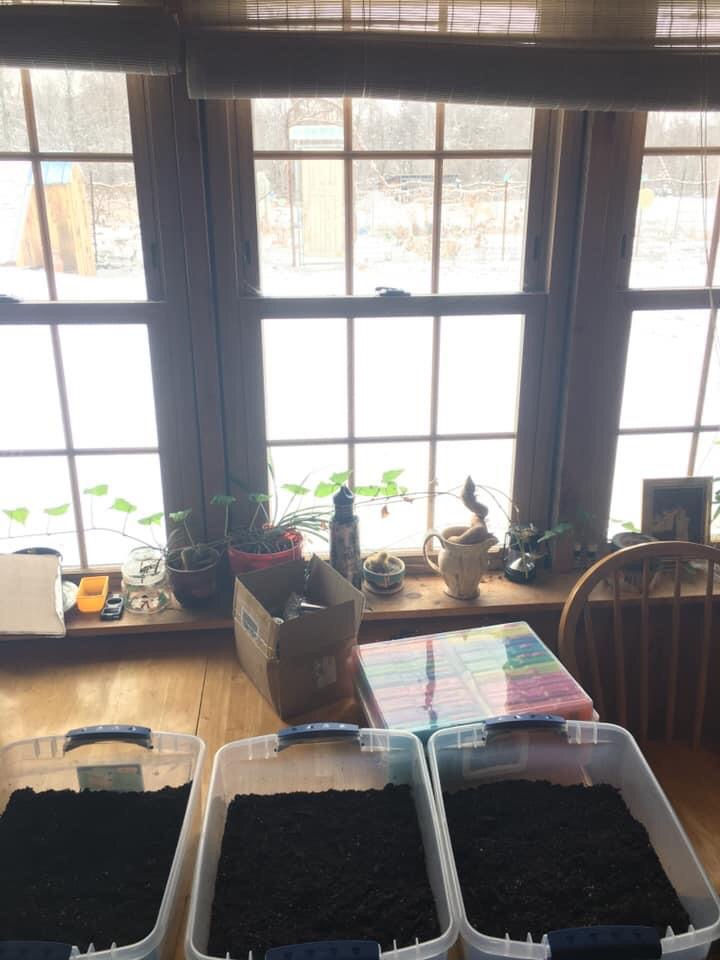
WHAT YOU NEED... first you need to collect clear jugs, whatever you can come up with. Milk jugs, juice jugs, the first year I got some large fry oil jugs from the restaurant I worked at, and they worked fantastic! They were a bit bigger, and I could get a lot of room to plant in them. Be creative with your ideas, reduce and reuse! Two years ago, I invested in small totes with lids that clip on tight and made them my designated winter sowing containers. I had winter sowed for a few years by then and had some experience in what criteria I had in searching for new containers. I wanted something that would stack together, minimizing space, both with the lid on and off. I saw that my milk jugs and juice jugs took up so much space during the summer when they were not needed anymore. This meant my main concern was that they stacked and minimized space during storage. The next concern was that the lid locked on so that the wind couldn't blow it off and also that they were a heavier grade plastic so that as the sun beat on them, I would have a few years before they were too brittle to use. Now we need to collect the soil that we will use. Obviously, you use what you have, but if you can, I highly recommend buying a “SEED STARTER MIX”. Why? There are 3 basic options that you will be familiar with, the main difference is weeds or unwanted seed. The first is potting soil, this is your typical potting mix for re-potting your house plants or established plants. It usually contains some commercial fertilizer and is heated to be sterile ensuring that it doesn't come with weed seeds that grow along with your starts, but it is not completely sterile. The second is garden dirt, this is dirt that you get from your compost pile or garden, and it also should have good nutrient, but it will have weed and plant seeds that are still viable, and you will have competition in your containers. This brings us to seed starter mix. It is designed to have the nutrient and also the moisture retention components that help the seeds from drying out. Any of these will work, and use whatever you have, but consider investing into your spring seedlings, after all you are saving yourself so much money just from growing your own this year!
THE Process... With whatever jug or container, you use you need to first start with poking holes all over the bottom. You want to make sure that there is proper drainage, so you don't kill your new babies by drowning them. You then need to make sure you can get INTO your container. You also want to make some holes in the top to ensure airflow and a way for too much moisture to escape. You will want many more holes in the bottom, then the top. If you have a jug cut it so that it hinges open, clean and wash well. Add 3-4 inches of your soil medium and then plant your seeds. You can sow heavy to have lots extra or organize in rows and plant only what you need to start, but keep in mind that if they are too close to each other, they won't have room to grow strong and are harder to separate in the spring for planting in the garden. Either way, they will grow well, just an earlier maintenance may be needed to help ensure their growing once they start growing. Then you want to lightly cover them with soil, pat them down, tape the jug shut with a good tape that will stay while exposed to the outdoor elements. (I use duct tape). Label your containers well to ensure proper identification later. I have found a Sharpy on the inside of the CONTAINER under the rim of the lid, and also on the underside of the LID works best. The reason for under the lid is because you will find that if the writing is exposed to the sun, it will fade and by spring may not be seen.... You just might have some mystery boxes of plants come spring. Ask me how I know?... Set them outside and you're done! THE BEST THING?!!.... you got to play in the dirt and have healing from your garden fever! With whatever jug or container, you use you need to first start with poking holes all over the bottom. You want to make sure that there is proper drainage, so you don't kill your new babies by drowning them. You then need to make sure you can get INTO your container. You also want to make some holes in the top to ensure airflow and a way for too much moisture to escape. You will want many more holes in the bottom, then the top. If you have a jug cut it so that it hinges open, clean and wash well. Add 3-4 inches of your soil medium and then plant your seeds. You can sow heavy to have lots extra or organize in rows and plant only what you need to start, but keep in mind that if they are too close to each other, they won't have room to grow strong and are harder to separate in the spring for planting in the garden. Either way, they will grow well, just an earlier maintenance may be needed to help ensure their growing once they start growing. Then you want to lightly cover them with soil, pat them down, tape the jug shut with a good tape that will stay while exposed to the outdoor elements. (I use duct tape). Label your containers well to ensure proper identification later. I have found a Sharpy on the inside of the CONTAINER under the rim of the lid, and also on the underside of the LID works best. The reason for under the lid is because you will find that if the writing is exposed to the sun, it will fade and by spring may not be seen.... You just might have some mystery boxes of plants come spring. Ask me how I know?... Set them outside and you're done! THE BEST THING?!!.... you got to play in the dirt and have healing from your garden fever! With whatever jug or container, you use you need to first start with poking holes all over the bottom. You want to make sure that there is proper drainage, so you don't kill your new babies by drowning them. You then need to make sure you can get INTO your container. You also want to make some holes in the top to ensure airflow and a way for too much moisture to escape. You will want many more holes in the bottom, then the top. If you have a jug cut it so that it hinges open, clean and wash well. Add 3-4 inches of your soil medium and then plant your seeds. You can sow heavy to have lots extra or organize in rows and plant only what you need to start, but keep in mind that if they are too close to each other, they won't have room to grow strong and are harder to separate in the spring for planting in the garden. Either way, they will grow well, just an earlier maintenance may be needed to help ensure their growing once they start growing. Then you want to lightly cover them with soil, pat them down, tape the jug shut with a good tape that will stay while exposed to the outdoor elements. (I use duct tape). Label your containers well to ensure proper identification later. I have found a Sharpy on the inside of the CONTAINER under the rim of the lid, and also on the underside of the LID works best. The reason for under the lid is because you will find that if the writing is exposed to the sun, it will fade and by spring may not be seen.... You just might have some mystery boxes of plants come spring. Ask me how I know?... Set them outside and you're done! THE BEST THING?!!.... you got to play in the dirt and have healing from your garden fever!
So, there you go, winter therapy! Work at your leisure doing a jug at a time. No rush, no hurry, just enjoy and work towards a wonderful summer garden filled with you own plant starts. As we learn, we grow and incorporate into what works for us! I have so much knowledge from previous topics, and I tried to figure out how I can interweave them to get the best of both worlds... maybe take winter sowing to the next level. I will do another follow up blog on how I have customized this for me, incorporating my lunar planting and also for my short growing season. Stay tuned!


Comments